» Site Navigation

0 members and 896 guests
No Members online
Most users ever online was 54,199, 06-29-2026 at 02:43 AM.
» Today's Birthdays
» Stats
Members: 76,102
Threads: 249,247
Posts: 2,572,954
Top Poster: JLC (31,651)
|
-
Plans for plumbing a mouse rack (also long)
Here is a continuation of my other post. this section deals with plumbing
Mark
-----------------------------------------------------------
For water, I ran 1/2" PVC tubing throughout the rack with Edstrom Variflow valves for the water valves. I used the type with the screw on connectors instead of the barbed connectors, the barbed connectors are used with flexible tubing. You can get these at http://www.agselect.com/

I drilled 3/8" holes in the middle of 40 PVC end caps so I could screw the valves in, no need to tap the holes, the valves screwed into the pvc fairly easily with a socket wrench. I did not screw in the valves permanantly at this time, I just wanted to show you how they look. I cemented the end caps onto 40 90 degree elbows with a 1" long piece of 1/2" PVC tubing.

For fittings, I used a total of 40 end caps, 52 90-degree elbows 39 T's 2 shut off valves, one screw on quick connector and a bulkhead fitting. I also used the better part of 6 lengths of 10' X 1/2" PVC tubing.
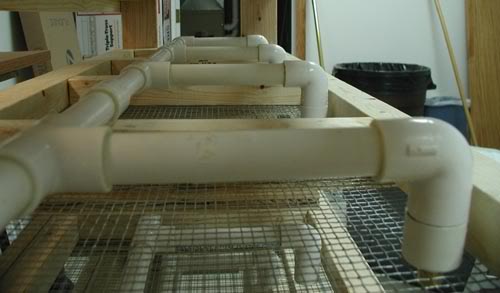
In this picture you can see a completed level, you can see the end caps are attached to the elbow which attaches to a 5-1/2" piece of tubing that attaches to a 'T' The back of the level where the 'T's are attached to each other starts with a 4-1/5 length of PVC, then a 'T' then a 9-1/2" length of PVC then another 'T' and another length of 9-1/2" PVC and the 3rd 'T' then another length of 9-1/2" PVC with an elbow on the end. The goal is to make sure that the end caps are all flat and on the same plane. You can see where I goofed up and had to cut the level apart and fix it with straight connectors so that it was flat. A good way to assemble the level would have been to cement the 5-1/2" tubes to the 'T's first, then attach the 'T's together with the 9-1/2" tubes making sure to use a hard flat surface so that the 5-1/2" tubes stay laying flat on the floor, attach the elbows with the end caps last (make sure they're pointing in the right direction). A rubber mallet is handy to make sure the tubes are seated all the way into the fixtures. I cemented everything together with PVC cement.

Here is the rack with all the watering levels waiting to be attached to the upright water supply tube which is leaning against the bench to the left of the rack

Make sure that each end cap is laying flat against the hardware cloth before you attach the sipper valves. you'll need to cut out a square of wire using needlenose wire snips to make sure that the valve can fit through the mesh.

screw the base of the valve into the end cap through the hardware cloth.

Screw the top of the valve into the base.
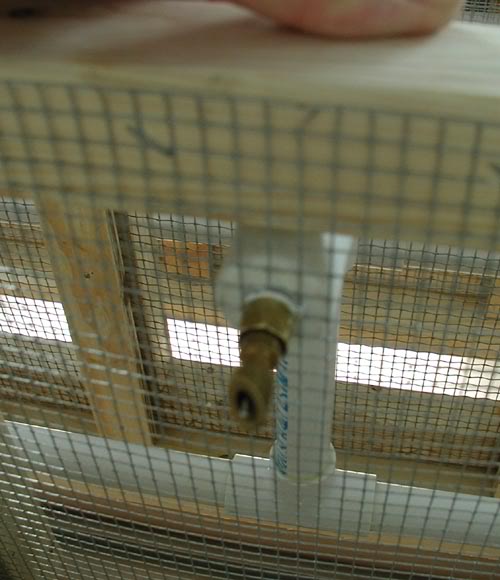
Make sure that all of the valves are firmly screwed in through the hardware cloth into the PVC tubing and make sure that the whole assembly is level to cut down on air pockets.
Here is a picture of the valve going through the hardware cloth, view is from the front of the rack.

Here is a picture of the upright water supply line before it was attached and cemented into the levels. There are 6" tubes between each of the 'T's. I also put a shutoff valve in the middle so that I could shut off the water to the lower 5 levels and just use the upper 5 levels if I ever wanted to.

Here is a picture of the upright water supply tube after it's been attached to each level, you can see I have a screw on quick connector at the top.

Here is a closeup of the middle shutoff valve.

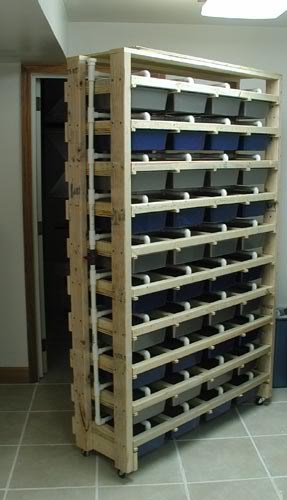
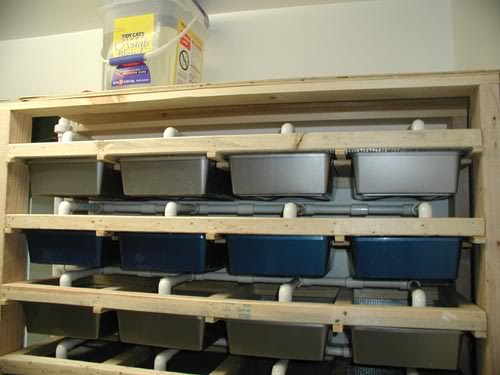
Here is a picture of the completed rack with tubs. You can see I've also added casters to the bottoms of the 2"X4"s So I can wheel it around and clean around it out easier.
Here is the water supply bucket that I'm using. I used a clear bucket so I could see the water level, it also has a top so that dust doesn't get into the water supply. The PVC is attached to the bucket using a bulkhead fitting that basically is a compression fitting that screws in through each side of a hole at the bottom side of the bucket. This is then attached to a short length of PVC tubing going to a shutoff valve which then goes to an elbow that goes to the other half of the screw on quick connector.

Here is a picture of the completed bucket assembly attached to the water supply tubing with the screw on quick connector. The whole thing rests on top of a piece of plywood nailed to the top of the rack. When complete, you'll have a low pressure gravity fed watering system for your rack.

Here is the completed rack with the water supply hooked up. It contains 10 levels in all with 4 tubs per level for a total of 40 tubs. When I have it filled to capacity I expect to have 1.3 adult mice in each tub for a total of 160 adult breeder mice which I hope will eventually supply me with over 1000 pinkies a month .
Let me know if this was helpful to anyone building their own mouse rack or if you have any other tips or suggestions you would make.
Mark
-
The Following 15 Users Say Thank You to MarkS For This Useful Post:
- + Show/Hide list of the thanked
-
adamjeffery (06-26-2011),bamf64 (11-18-2009),Capital Rodents (02-15-2011),EdShal (09-11-2010),Elekia (10-15-2018),Hwom91 (02-07-2012),MR Snakes (12-11-2018),Resiak (12-11-2014),Sarin (02-02-2010),satomi325 (08-21-2011),spitzu (01-11-2011),T&C Exotics (12-17-2009),TankMasterOG (07-26-2009),twisted007 (01-17-2010),WmHrbst (07-31-2017)
Posting Permissions
- You may not post new threads
- You may not post replies
- You may not post attachments
- You may not edit your posts
-
Forum Rules
|


 Reply With Quote