» Site Navigation

1 members and 1,681 guests
Most users ever online was 54,199, 06-29-2026 at 02:43 AM.
» Today's Birthdays
» Stats
Members: 76,098
Threads: 249,242
Posts: 2,572,928
Top Poster: JLC (31,651)
|
-
BPnet Veteran


My first rack!!! Built and 98% done
All I need to do now is add a thermostat, which I already have. I plan on mounting the power cord on the back connected to two powerstrips. I am building a second rack identical to this, and one thermostat will power the top 6 shelves in both racks, and the bottom thermostat the bottom 5 shelves in both racks, helping me keep a better heat grading across the different heights/heat in the room.
Here is the view from the back after the shelves have been secured, with the flexwatt attached.
I ran 4' of flexwatt and soldered it to the ends of the extension cord, and then stapled them down so they wouldnt pull and break the solder
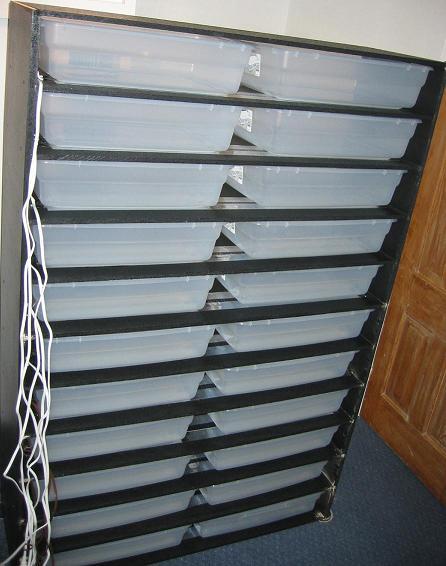
I put the back on then, first stapled a 6' x 4' piece of Reflectix Radiant insulation to keep the heat moving the right direction, and then 2 6'x2' pieces of 1/2" particleboard . Screwed into the back of each shelf twice, and once on each side, for support.

I still need to add the thermostat, but, Im happy with what I have so far 
More info later.
-
-
-
-
BPnet Veteran
Re: My first rack!!! Built and 98% done
 Originally Posted by mlededee
dang that is NICE. wanna come by my place and put one of those together in my herp room?  
hehe, dont even ask how long this took me to make Was my first rack. Maybe after I have gotten it down.
I also cut 1/4" notches for each shelf to slide into (dado).. Word of warning, if you are making it for 1/2" shelves, make it 5/8 of an inch for easy sliding, otherwise you will end up with my frustrations
Copied from another post on another forum i made:
Dimensions: 4' wide x 6' tall x 17" wide
Material: 1/2 Particle board for the shelves, 3/4 Particle board for the sides
Fastening: 2 screws in each side of the shelf, 1/4" dados, 4 screws in the back of each shelf (back is 2 6' x 2' pieces of 1/2 particleboard
Heating: 3" flexwatt run about 3.5-4 inches from the absolute back of the shelf, each shelf has its own extension cord for individual control of heating. Held down by foil tape. Back of unit is covered in a 4x6 pieces of Reflectix underneath the particleboard mentioned above. 2 Helix thermostats, one for the top 6 shelves, one for the bottom 5 shelves. I plan on putting two of these racks side by side and using one helix for the top 6 of both shelves (480 watts) and the second helix for the bottom 5 shelves ( 400 watts)
Paint: Two coats of paint on all sides of the particle board, bathroom type paint (forget the exact kind offhand)
I may or may not add front supports as spacers if i need to adjust the exact spacing of the tubs. As of now there is no bowing, and i dont see 2 tubs with 8 lbs weight maximum causing any problems with the solid back and screws in the back of the shelves in the center.
I may be missing something, there is no thermostat in the picture, will have that all hooked up tommorrow. If anyone has any input or suggestions, or questions please feel free.
I was able to pick up the front and tip this guy up on end by myself no problem. I have furniture glider pads under each corner and can slide it around the reptile room easily.
Price List:
Just the Rack + flexwatt, etc
(4) - 1/2" 4'x8' Particle Board - $44
(1) - 3/4" 4'x8' Particle Board - $13
(98) - #6 1 5/8 Drywall Screws- $2
(44) - Feet of 3" Flexwatt - $88
(11) - Extension Cords - $11
(1) - Roll of Foil tape - $10
(1) - Gallon of Paint - $20
(1) - Reflectix Insulation - $8
(2) - 6 outlet power strips - $4
(40) - Staples - $0 (like 20 cents)
------------------------------
total $200 (wow, to hold 22 - 28 quart tubs!)
Thermostat
(1) - Helix Thermostat (sharing 2 between 2 racks, so 1 per rack avg) $135
Tubs
(22) - 28 quart tubs - $88
Hides + Water bowls
(22) - ceramic glazed bowls $13
(22) - Plastic bowls with hole cut $6
Total for full rack with hides and water bowls and tubs and thermostat
$442
for 22 snakes that fit in a 28 quart tub (16x23 are the dimensions). So ~ 3 feet snake max.
I am h a p p y.
Now I just need to make another one of these, and then 2-3 4'x4' hatchling racks (wish my sanity luck!)
Last edited by SnakeySnakeSnake; 03-25-2006 at 01:17 AM.
-
-
BPnet Veteran
Re: My first rack!!! Built and 98% done
Follow up question. Is there a "max gap" recommended for tubs in a rack system like this, based on size? right now my carpentry wasnt perfect, and it varies from 1/8 to a little over 1/4 of an inch.
With this 1/4 of an inch allow enough airflow? (I would hope so).
Is there any point in putting side holes in these tubs now that i have it in a rack system (not lidded?) I think there should be plenty of air flow into them from the tops, but i could be wrong.
Thanks
-
-
Re: My first rack!!! Built and 98% done
That is an awesome job . As far as the air flow is concerned you have nothing to worry about. That is just fine. Once its wired up to the stat you'll probably spend some time dialing in the humidity more than anything else considering you split the heating source. Nice touch using the reflextic. That should work out well for you. Really nice work. . As far as the air flow is concerned you have nothing to worry about. That is just fine. Once its wired up to the stat you'll probably spend some time dialing in the humidity more than anything else considering you split the heating source. Nice touch using the reflextic. That should work out well for you. Really nice work.
Tony.....
3.1 Crumb Snatchers
0.1 Domestic Engineer
-
-
BPnet Veteran
Re: My first rack!!! Built and 98% done
Originally Posted by ARamos8
That is an awesome job . As far as the air flow is concerned you have nothing to worry about. That is just fine. Once its wired up to the stat you'll probably spend some time dialing in the humidity more than anything else considering you split the heating source. Nice touch using the reflextic. That should work out well for you. Really nice work.
Thanks man, Im glad it turned out the way it did. Several very frustrating things I ran into, but Im hoping my next one will go smoothly. Either way it ended up coming out ok, whew!
-
-
Re: My first rack!!! Built and 98% done
Sweet!  I love all the do it yourself racks, I wish I was that handy! I love all the do it yourself racks, I wish I was that handy!
~Sheree~
 Because Snakes are Beautiful!
http://www.bluegorgon.com/
4.1 snakes so far (Gomez, Falkor, Ma-tsu, Neptune, Irwin)
Because Snakes are Beautiful!
http://www.bluegorgon.com/
4.1 snakes so far (Gomez, Falkor, Ma-tsu, Neptune, Irwin)
2.1 house rabbits (Daphne, Bowie, Unut)
0.1 Jeweled Lacerta (Dana)
In loving memory of Cleo
1989-2007
-
-
BPnet Veteran
Re: My first rack!!! Built and 98% done
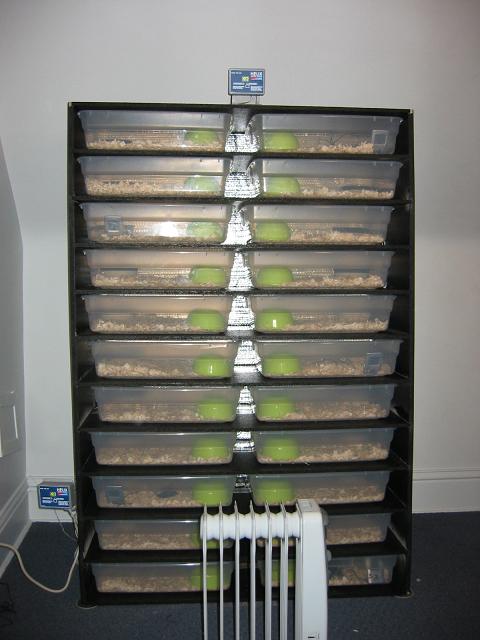
Loaded and Heating, wish me luck!
-
-
Re: My first rack!!! Built and 98% done
Looks great! Are those the Walmart bowls? My snakes love those! BTW, have you noticed any problems with the particle wood sagging now that it's loaded up?

-Lawrence
-
-
BPnet Veteran
Re: My first rack!!! Built and 98% done
Wow! Thats a very nice rack.
-
Posting Permissions
- You may not post new threads
- You may not post replies
- You may not post attachments
- You may not edit your posts
-
Forum Rules
|


 Reply With Quote

