» Site Navigation

2 members and 3,356 guests
Most users ever online was 6,337, 01-24-2020 at 04:30 AM.
» Today's Birthdays
» Stats
Members: 75,097
Threads: 248,539
Posts: 2,568,744
Top Poster: JLC (31,651)
|
-
BPnet Veteran


DIY cooler incubator
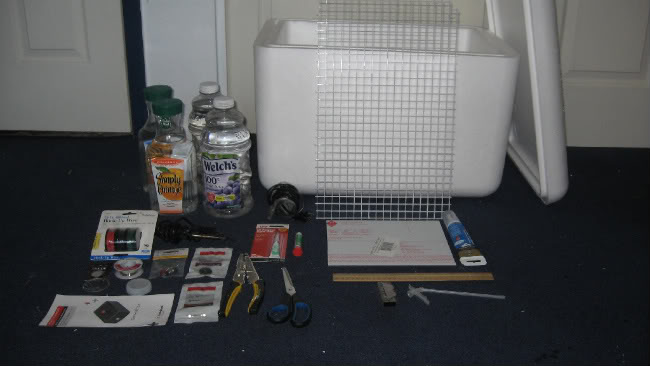
Materials needed:
1) Cooler setup:
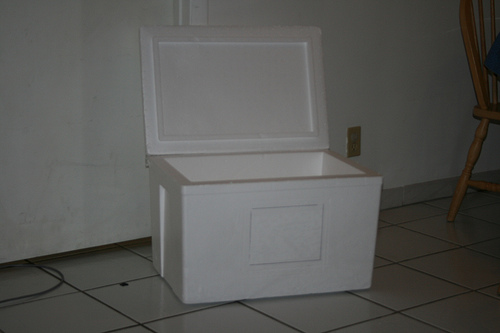
Cooler (inside measured 1'1" W x 1' H x 1'8" L) - Outdoor shop - $4.00
3 ft. of 11" flexwatt (I used 4" in this one, but 11" keeps heat easier) - $18.00
4 large bottles filled with water - FREE
Egg Crate Light Pannel - Home Depot - $10.00
Lexan Polycarbonate .093 8"x10" - Home Depot - $3.13
GE silicon 2 Window and Door - Home Depot - $3.72
Great Stuff insulation spray - Home Depot - $5.60
2) Light setup:
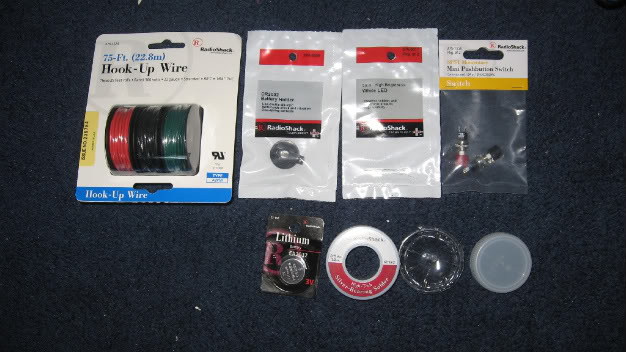
LED light (275-0017) - RadioShack - $1.99 (2 pack)
Battery CR2032 (230-0162) - RadioShack - $4.99
Battery holder CR2032 (270-0009) - RadioShack - $.99
SPST .5A Momentary Switch (275-0646) - RadioShack - $2.99 (2 pack)
hookup wire (278-1225) - RadioShack - $5.99
Gatorade cap
Large cap for wire/battery housing (I used cap from Great stuff)
Electrical tape - Home Depot - $1.97
Silver solder - Radio Shack - $5.49
Total Cost = $ 68.86
Tools needed:
Sharp Exacto Knife
Regular Knife
Wire cutter/ stripper
Sharp Scissors
Pencil
Q- Tips
Soldering iron
You will also need:
Prepared egg box- http://ball-pythons.net/forums/showthread.php?t=71770
Thermometer/hygrometer with probe (Acu-Rite preferred)
Good Thermostat (Helix or Herpstat preferred)
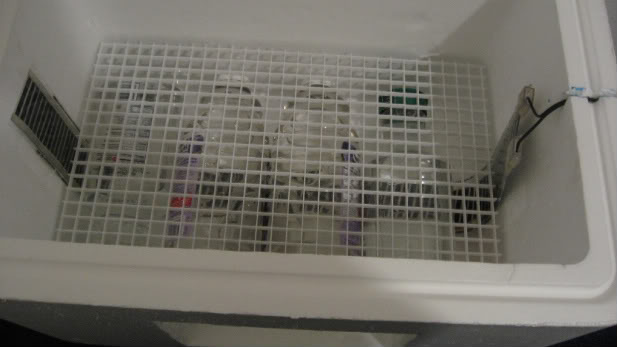
Construction:
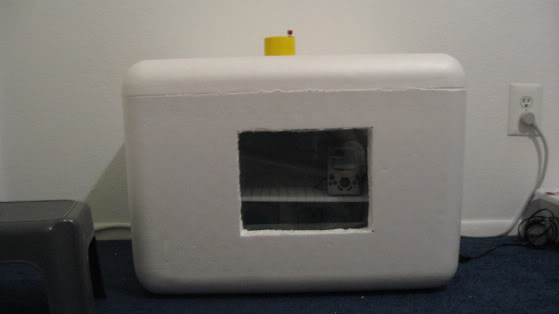
1. Create the window -
Cut out a square in the front center of the cooler measuring 9"x7". On the inside of the cooler cut a 1/2" wide by 1/2" deep frame
around the already cut square. Place the Lexan Polycarbonate
window into the frame on the inside of the cooler. Use the silicon
to seal the window in place, applying it on both sides of the window. I used a Q-Tip to smooth out the silicon bead, creating an airtight seal.


2. Create the light -
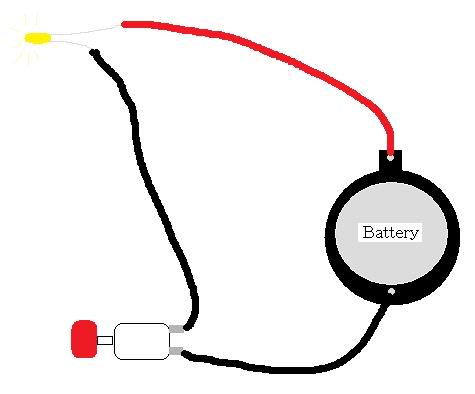
I used 2 different colored wires for clarity when creating the circuit. Cut a piece of RED wire 3". Cut 2 pieces of BLACK wire, one 3" and the other 2". Strip both sides of each wire. Solder one end of the 2" BLACK wire to the + side of the battery holder and the other end to one of the metal tabs on the push button. Solder one end of the 3" BLACK wire to the remaining metal tab on the push button, and the other end to the smaller leg of the LED light. Lastly, solder one end of the 3" RED wire to the larger leg of the LED light, and the other leg to the - side of the battery holder. Wrap all connections with electrical tape so none of them come in contact with each other, ruining the circuit.
Poke a hole through the top center of the cooler lid. Run the LED light through, and leave the battery and switch on the top of the lid. Fill the hole with Great Stuff to seal it off. Use the a large cap to enclose the battery and wiring
(Optional) Poke a hole in the gatorade lid and push the light
through. Glue the gatorade lid to the bottom of the cooler lid.
3. Assemble the insides -
Cut a small slit for the flexwatt cord on the top side of the cooler.
Tape the flexwatt down on one side, across the bottom, and up the other side. Place the bottles filled with water on top of the flexwatt. Cut a piece of egg crate light pannel to fit inside the cooler, and place that on top of the bottles of water. This is where your prepared egg box will be.


You are finished! Good job.
**Note: You can use this to set up a plastic coleman type cooler as well. Just change the measurements to suit your needs, and maybe add a small fan for even heat distribution.**
Last edited by Stewart_Reptiles; 08-21-2008 at 05:51 PM.
myspace.com/unknownpalace
-
The Following 17 Users Say Thank You to mmchoppers For This Useful Post:
- + Show/Hide list of the thanked
-
AKballs (10-07-2011),Andybill (03-09-2012),CoolioTiffany (07-13-2009),Danounet (03-07-2010),jben (04-15-2010),kill go (09-16-2016),LunaBalls (01-14-2011),panella0115 (09-12-2012),Redneck_Crow (09-28-2012),reptidude1 (11-14-2009),Ridinandreptiles (11-01-2012),TheBallPythons (06-12-2013),the_rotten1 (03-05-2017),Udon (04-12-2020),Valentine Pirate (11-04-2012),xXxFluffyEmoxXx (07-04-2009),Zedd (11-26-2010)
-
Banned
Re: DIY cooler incubator
This needs to be sticky.. Very informative and detailed.. Would be PERFECT for those who just have a clutch or 2
-
-
Re: DIY cooler incubator
Great job and sticky worthy 
The broken link for one of your picture has also been corrected 
-
The Following User Says Thank You to Stewart_Reptiles For This Useful Post:
-
BPnet Veteran
Re: DIY cooler incubator
Hey guys thanks for the feedback! Thanks Deborah for fixing the link as well as stickying it!
I love DIY and have used many of them so I am glad to contribute.
-Jordan
myspace.com/unknownpalace
-
-
BPnet Veteran

Re: DIY cooler incubator
might i ask what the "great stuff" is for?
-
-
BPnet Veteran
-
-
Re: DIY cooler incubator
How much is it for me to just ask skip the "making it" step and get someone to make it for me???? 
ALL THAT SLITHERS - Ball Python aficionado/keeper
breeder of African soft fur Rats. Keeper of other small exotic mammals.
10 sugar gliders
2 tenrecs
5 jumping spiders
paludarium with fish
Brisingr the albino
Snowy the BEL
Piglet the albino conda hognose
FINALLY got my BEL,no longer breeding snakes. married to mechnut450..
-
-
Re: DIY cooler incubator
 Originally Posted by 4theSNAKElady

How much is it for me to just ask skip the "making it" step and get someone to make it for me????
LOL His materials list ads up to $69 without egg boxes or a way to control heat. Without this I'd charge less than that, ready to plug in.  It's all about massive wholesale parts. It's all about massive wholesale parts.
Last edited by PythonWallace; 09-01-2008 at 11:03 AM.
Reason: I removed the price so a mod didn't have to :)
-
-
Registered User

-
-
Registered User

Re: DIY cooler incubator
Originally Posted by mmchoppers
Materials needed:
1) Cooler setup:
Cooler (inside measured 1'1" W x 1' H x 1'8" L) - Outdoor shop - $4.00
3 ft. of 11" flexwatt (I used 4" in this one, but 11" keeps heat easier) - $18.00
4 large bottles filled with water - FREE
Egg Crate Light Pannel - Home Depot - $10.00
Lexan Polycarbonate .093 8"x10" - Home Depot - $3.13
GE silicon 2 Window and Door - Home Depot - $3.72
Great Stuff insulation spray - Home Depot - $5.60
2) Light setup:
LED light (275-0017) - RadioShack - $1.99 (2 pack)
Battery CR2032 (230-0162) - RadioShack - $4.99
Battery holder CR2032 (270-0009) - RadioShack - $.99
SPST .5A Momentary Switch (275-0646) - RadioShack - $2.99 (2 pack)
hookup wire (278-1225) - RadioShack - $5.99
Gatorade cap
Large cap for wire/battery housing (I used cap from Great stuff)
Electrical tape - Home Depot - $1.97
Silver solder - Radio Shack - $5.49
Total Cost = $ 68.86
Im new to all this so if Im wrong please forgive me.
The work and idea is great, but the cost makes this into a joke to me.
I don't understand.. Do professionally made incubators cost much more than what is spent for these materials? With the cost of materials alone, I'd rather spend a few more bucks to buy me a real one with out the effort of going, gathering, cutting, measuring, working, ect. and have a professional legit looking one instead.
How much would a incubator like this cost in the market?
Does an incubator cost alot more than what is spent for these materials?
Great work btw and thanks for post.
-
Posting Permissions
- You may not post new threads
- You may not post replies
- You may not post attachments
- You may not edit your posts
-
Forum Rules
|


 Reply With Quote