» Site Navigation

3 members and 3,313 guests
Most users ever online was 6,337, 01-24-2020 at 04:30 AM.
» Today's Birthdays

» Stats

Members: 75,097
Threads: 248,540
Posts: 2,568,748
Top Poster: JLC (31,651)
|
-
Carbon Air Purifier - DIY
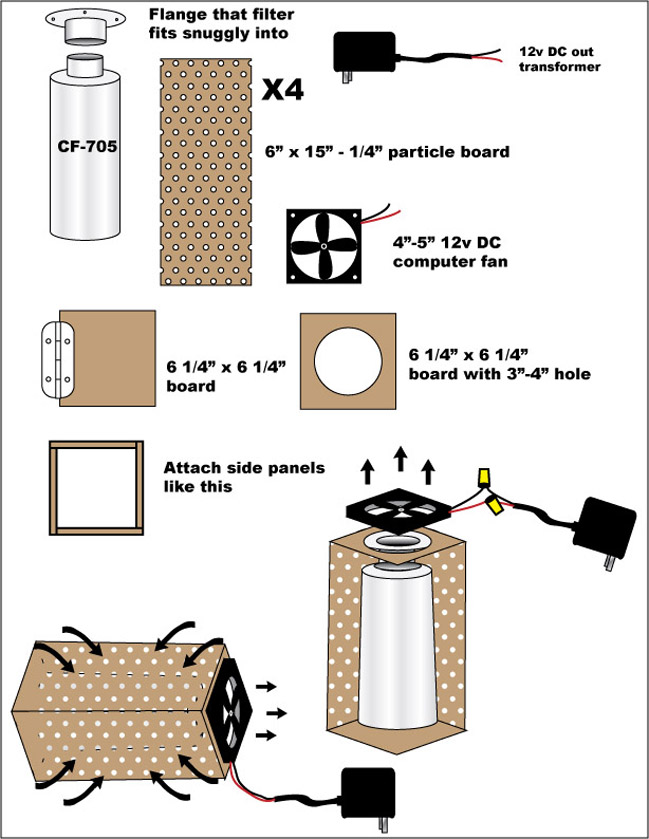
Since I got so many requests for plans for my carbon air purifier I wrote this up. These plans are for the CF-705 can filter found here: http://www.wormsway.com/detail.asp?sku=CF0067
This is the smallest one they sell, so if you fave a larger room or a large space, go with an appropriate size can filter and alter the plans to fit the new size.
Materials and tools:
-1 filter - CF-705 - http://www.wormsway.com/detail.asp?sku=CF0067 - Mine have always come with cloth pre-filters, but if yours doesn't you can wrap a layer of cloth filter around the can and secure it with a few staples.
-1 flange that fits the can filter outlet snuggly (if it is a little loose you can wrap duct tape around the filter's outlet until it's a tight fit)
-4 panels of 1/4" particle board - 15" x 6"
-2 wood panel squares - 6 1/4" x 6 1/4"
-1 4"-5" 12v computer fan (if you go any bigger than the CF-705 use a more powerful fan)
-1 12v DC transformer - http://www.allelectronics.com/cgi-bi...NSFORMER_.html
- 1 small hinge
- 3"-4" circle cutter drill bit
- Drill
- Silicone
- wood glue or gorilla glue
- 2 wire nuts and electrical tape

1. Drill out a 3" - 4" hole in the center of one of the 6 1/4" wood squares.
2. Put a bead of silicone around the hole, and center the flange over the hole.
3. Use 3/8" wood screws to better secure the flange to the wood. If the flange you bought extends beyond the top, you have to cut some of it off in 4 sides ou use wider particle board and squares for the housing.
4. Cut the end off of the cord from the transformer and the fan, and strip the ends of the wires 1/2". There are sometimes extra wires on the fan, but you will only need two. These are usually black and red. Touch the two wires from the transformer to the fan wires until the fan motor starts to spin.
5. Once you know which wires to connect, use the wire nuts to splice the wires, then seal the entire connection with electrical tape.
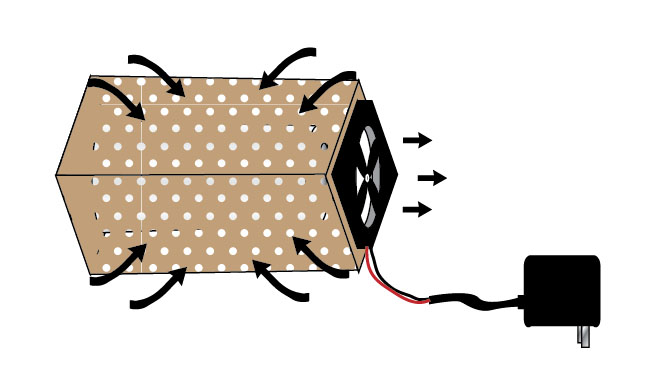
6. Put a bead of glue around the hole on the side opposite the flange, and center your fan over the hole so that it's BLOWING OUT, not into the flange. Secure the fan with 4 screws.
7. Use wood glue to attach the 4 side panels together to make the housing for the filter.
8. Glue the top with the fan to the housing, with thte fan on the outside.
9 Use the hinge to attach the bottom panel to the housing. This is so you can open it to change the filter every 18 months.
10. Push the can filter into the flange, close the bottom and plug in.

Ozone generator DIY to follow
-
 Posting Permissions
- You may not post new threads
- You may not post replies
- You may not post attachments
- You may not edit your posts
-
Forum Rules
|


 Reply With Quote