» Site Navigation

1 members and 3,135 guests
Most users ever online was 6,337, 01-24-2020 at 04:30 AM.
» Today's Birthdays
» Stats
Members: 75,103
Threads: 248,542
Posts: 2,568,766
Top Poster: JLC (31,651)
|
-
Heating regulation for cheap skates.
Despite the claims made by some pet supply manufacturers and pet stores, We all know that an unregulated heating device is a good way to end up with a burned snake. And while small portable thermostats work really well and most of us consider them to be essential equipment, they can still be pretty expensive. It can be pretty offputting to a new snake owner when they're told they now have to spend even more money on their new pet (you want me to spend HOW much money on a $20.00 snake??? ARE YOU NUTS???)
Fortunately there is a much cheaper option. Rheostats (dimmer switches) have been used to good effect for many decades in the herpetocultural hobby. Long before small thermostats were even available, people were making their own heating regulators using a few cheap parts you can pick up at any home supply or hardware store.
A thermostat is a smart device that will keep a constant temperature by regulating the amount of electricity going to your heating device by contantly checking the temperatures being sensed by a remote probe. When the probe registers a temperature that is lower then the set point of the thermostat, the thermostat turns on the electicity to the heating device which warms up the cage, when the probe registers the higher temperature, the thermostat shuts off the power to the heating device. Modern thermostats send electical pulses to your heating device many times per second which will keep the temperatures in the cage very stable.
A rheostat on the other hand is a dumb device that doesn't care about temperatures. It regulates the amount of electricity going to your heating device according to where the knob on the dial is set. It has to be manually adjusted up or down. Turn the knob higher to get warmer temps or lower to get cooler temps, it will not adjust itself according to the temperature in the cage. If the room temperature goes up a few degrees, the cage temperature goes up a few degrees, if the temperature drops in the room then the temperature in the cage will drop too. You have to be much more vigilant in checking your own temperatures and manually adjusting the dimmer switch. With a thermostat you can pretty much set it and forget it while a dimmer switch is much more labor intensive.
However, despite it's drawbacks, dimmer switches can be quite effective in regulating the temperatures in your cage especially if you check temps often and have the cage in a room that is not prone to large temperature swings. It SURE beats bringing your reptile to a vet to treat a burned belly caused by an unregulated heating device.
Here is how I make my dimmer switch devices. I have some of these that I have made that are still in use today and have been working for over 15 years. (actually, some are more likely over 20 years old)
Start by assembling your supplies, I picked these up at home depot.
Rotary on/off Dimmer Switch $5.49
Plastic Electric Utility Box $0.80
Plastic face plate for Utility Box $0.58
6' Indoor Extension Cord 16Ga White $1.47
Black Electricians Tape $0.72
Clear 100% Silicone (optional) $3.98

Cut your extension cord and split the wires a few inches and strip about 5/8" of insulation from the ends. I like to keep the female end close to the dimmer switch box and leave the male end long so I'll cut about 9"-12" back from the female end.
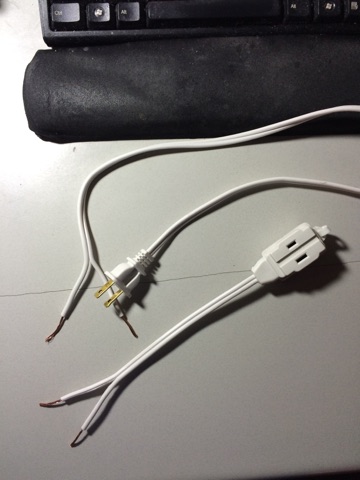
Notice that when you split the cord the wire has two sides, one side is ribbed and one side is smooth. This will be important later

Feed the cut ends of both cords into the plastic utility box. Give yourself enough wire to work with but not so much that you end up stuffing a lot of it back in the box when you've finished. You'll notice that the electric utility box has a number of punch out plugs to feed the wire through. Use the smallest ones available, you don't want your box full of holes that are open to the outside.

Your dimmer switch will have three wires coming out of it, the green one is the ground wire which we won't be using since our extension cord doesn't have a ground wire. I generally just cut it off.

When wiring your dimmer switch, you'll want to wire the two wires coming out of the dimmer to only one side of the extension cord, it doesn't really matter which side as long as it's the same side (I generally choose the ribbed side). I will twist the ends of the two smooth wire sides together, screw on a wire nut and wrap in electrical tape.

Then I will twist together one of the wires coming from the dimmer switch to the wire on the ribbed side of the extension cord going to the female end and the other wire coming from the dimmer switch to the ribbed side of the cord going to the male end of the extension cord.
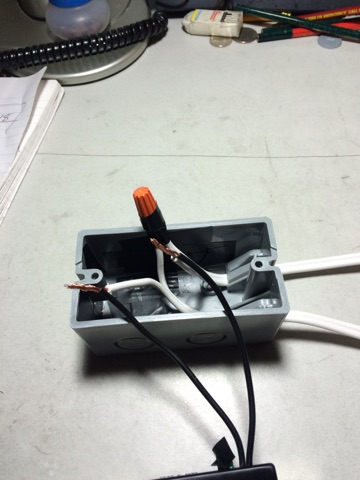
Screw on some wire nuts to hold the wires together and wrap in electrical tape.
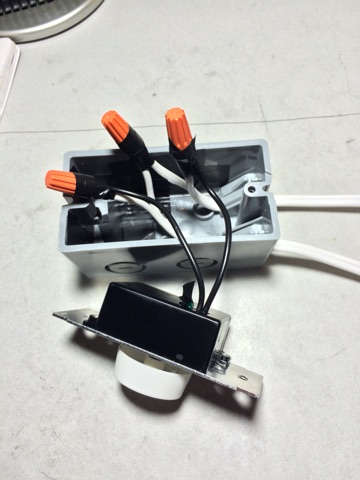
Stuff all of the wires back into the utility box.

Remove the knob from the dimmer switch, punch or drill out the plug in the middle of the face plate and then screw the faceplate onto the utility box.

Push the knob back onto the pole of the dimmer switch and you're pretty much done.

As an optional step, I like to fill all of the holes and cracks with silicone. I can get kind of sloppy with the water when I'm cleaning so I like to make it as water tight as possible. I know it's really not all THAT water tight but every little bit helps.

And here is your completed dimmer switch. Plug the male end into the wall and plug your heating device into the female end and you can use this to regulate the temperatures in your cage. It's a good idea to get an indoor/outdoor digital thermometer and attach the outdoor probe to your heating pad, then you can raise or lower the heat by adjusting the amount of electricity going to it with the dimmer switch.

Last edited by MarkS; 12-31-2014 at 12:59 PM.
Draco dormiens nunquam titillandus
-
The Following 14 Users Say Thank You to MarkS For This Useful Post:
- + Show/Hide list of the thanked
-
DC+loki (08-20-2015),ECechoHO (02-06-2015),EL-Ziggy (12-31-2014),ictguy78 (03-09-2015),janie (01-13-2022),JLC (12-31-2014),Kaorte (01-08-2015),Mike17 (02-16-2017),OhhWatALoser (12-31-2014),PitOnTheProwl (12-31-2014),Pyrate81 (12-31-2014),SnakeBalls (02-05-2015),StevenM (11-17-2015),Stewart_Reptiles (12-30-2014)
Posting Permissions
- You may not post new threads
- You may not post replies
- You may not post attachments
- You may not edit your posts
-
Forum Rules
|


 Reply With Quote