I was tired of using bowls, terracotta and other stuff that just looked cheap and fake. After much trial and error, mistakes and a small kitchen disaster (don't ask!! LOL), I finally came up with a hide that I can make myself that is very inexpensive and great to look at! It's even easy enough to do as a project with the kids! They're a lot of fun to make and with a bit of creativity, you can make some amazing looking hides for your animals.
Easy Home-Made "Realistic" Hides
These DIY home-made hides use an old fashioned clay recipe that's very inexpensive and pretty easy to make. They can be made to any size and customized depending on your needs. They can also be washed and sterilized as needed!

Supplies needed:
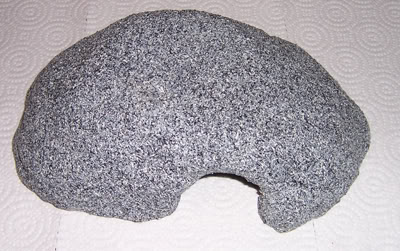
1 - bowl or container about the size you want for your hide mold. (for purposes of this tutorial, I used an existing hide as my mold)
1 - can of Krylon Matte Finish waterproofing spray. I used this instead of lacquer or shellacking because I wanted a duller finish, but any waterproofing agent would work just as well.
1 - paint (I used "Krylon Make It Stone!" textured paint but you can use whatever you like)
1 - course grit sandpaper
1 - rolling pin
1 - Batch of home-made clay
Step 1 - Make your home-made clay (below)
* 2 Cups Flour
* 1 Cup Salt
* 1 Cup Water
* 1 1/2 Tablespoons Olive or Vegetable Oil
* Wax Paper
* 1 Mixing Bowl
* Cookie Sheet
1. Mix the salt and flour together in the mixing bowl.
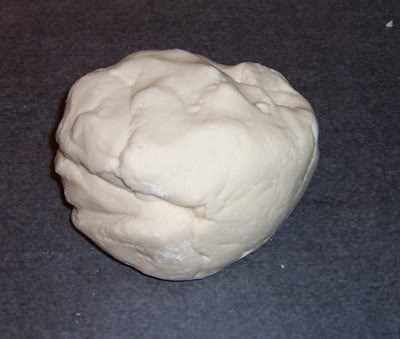
2. Slowly add the water and oil to the bowl and mix together until you get a smooth consistency. Your clay should look like this:
3. Tear off a large piece of wax paper and pull off a chunk of the dough.
Step 2 - Cover your bowl with a VERY thin layer of oil. It is very important that you do not skip this step.
Step 3 - Roll out dough to about 1/2 inch thickness. Shape the dough over your bowl keeping the thickness uniform. Try not to make too thick or your clay will not harden correctly. Don't forget the entrance opening!
Step 4 - Place your creation on a wax paper lined cookie sheet and cook in an oven at 250 degrees for about 45 minutes to 1 hour.
When they are done, remove from the oven and set aside to cool. You'll know it's done when clay is hard to the touch.
Step 5 - Once your clay is completely cooled, VERY CAREFULLY remove your mold from the clay. Do this by turning the cooled hide upside down and sand off any areas overlapping areas. Hide should now remove easily. Sand any rough areas until you are satisfied with the results.
NOTE* If you find that your clay is not completely hard once you remove your mold, carefully place your new hide upside down into the wax paper lined cookie sheet and put back into the oven until completely hard. (this will flatten the top of your hide, but will look fine once painted.) Remove and let cool completely to room temp. Trying to cool in the fridge or freezer will crack the clay.
Step 6 - Waterproof both inside and out with the Krylon Matte Finish spray making sure all areas are thoroughly waterproofed. Let dry.
Step 7 - Paint your hide as you desire. Be creative! Let dry.
Step 8 - Spray waterproofing over the DRY paint making sure all areas are covered. Let dry.
Step 9 - Wait about 36 hours for your hide to completely dry and air out before placing it in with any animal.
Finished Hide:


I made 15 hatchling hides for about $22.00! Can't beat that with a stick!
Tips and tricks!
*Add some fake plants with hot glue. Easy to remove and clean!
*Trim the edges of your hide with polished rocks.
*Line the inside with moss to hold humidity
*Instead of paint, after waterproofing your hide, hot glue moss to the outside to blend with your enclosure decor. (Moss will have to me removed to clean the hide)
Please feel free to share some tips that you have used on your own hides!


 Reply With Quote