» Site Navigation

0 members and 1,774 guests
No Members online
Most users ever online was 54,199, 06-29-2026 at 02:43 AM.
» Today's Birthdays
» Stats
Members: 76,104
Threads: 249,254
Posts: 2,572,984
Top Poster: JLC (31,651)
|
-
So I think I have an idiot proof incubator...
As a disclaimer, I take no responsibility for your eggs, I am simply reporting what is working for me. The incubator should be considered very experimental, use this design at your own risk.
And idiot proof is exactly what this idiot needed. I am a tinkerer by nature and this hobby gives many opportunity for tinkering. For some reason when I first started breeding, I found incubation to be hard to get "just right." Always seemed to be some sort of problem I had to constantly manage, too little humidity, or too much water on the eggs, mold, ect. Don't get me wrong, I still got things to hatch, but there were a few failures also and it flat out sucks. So about 3 years ago I started trying different things because I apparently couldn't get the cookie cutter methods to work well. The success of my last 2 clutches makes me feel I really need to share. Not only do I just pull the eggs, put them in and never touch a thing til hatch day, I also have a weird side effect, day 51-52 hatch days, not pip days, crawl out of egg days.
So here is what I have going on:
70 QT cooler

Thermostat for temp control, aquarium air pump to pump fresh air, small electrical box just contains splices for all the power, bigger box contains a small 120v to 12v transformer

Results of success today! Also just showing light diffuser, which is what the eggs sit on.

The cooler I have has grooves on the side, that make a great spot to put the pvc pipe, that supports the light difuser. Also notice the entire bottom is filled with water.
thermostat probe zip tied to the bottom of the pvc pipe

Standard cheap 80mmx80mm computer fan (powered by the 12v transformer), mounted by weatherproof screws, electrical connectors are stuffed with liquid electrical tape. Also all wires and tubes are epoxyed in.

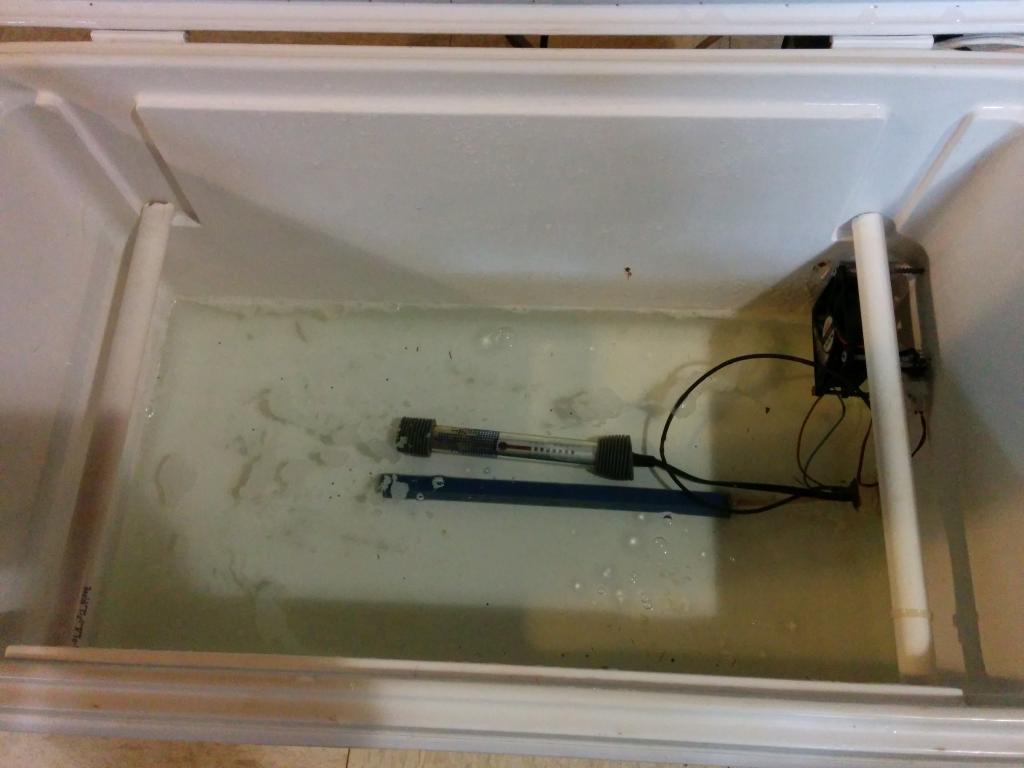
25watt aquarium heater for a heat source, connected to the thermostat output. Obviously the dots don't hold up well on it lol. Also a big air bubbler connected to the air pump.

So here was my logic with everything. I used a cooler because one of the cookie cutter incubator (you know I am just going to start calling them CCI) designs called for it so I had it laying around already, it also makes a good candidate to hold a few inches of water. CCI normally have bottled water for heat retention and a separate source of humidity, filling the bottom does both, I have enough to keep the bubbler and heating element under water, nothing specific about it. I use an aquarium heater instead of the CCI heat tape because it further increases the humidity. Then having a bubbler in the water increases humidity and also introduces fresh air into the system. I read about someone elses increased success pumping fresh air into their incubator and I figured why not. I really can't think of a way to get more moisture into the air, which seems to work well for the eggs.
The fan keeps air moving around the incubator, it helps water from building up, helping keep moisture in the air. Temps are evenly distributed around the incubator. Air movement also keeps water off the eggs, off the top and bottom of them, which is why I keep them openly on the light diffuser. No mold problems, no rotting eggs, (I had these issues with the CCI substrates) they are dry but, surrounded by humid air.
So I used this design this year and kept incubating at 89 degrees. I ran into a big surprise, day 50 hatch date... where the heck did that come from, maybe the female kept them inside her longer than expected? Next clutch, day 48 hatch date, next clutch day 50, next clutch day 49... obviously not a fluke but, problem with quite a few of them, was the yolks were not all the way absorbed and they were noticeably smaller on average than what I would call normal. I did however get 100% hatch rates. They all eventually started eating just fine so it wasn't a huge deal and while there was a cool factor with speed hatching eggs, obviously this wasn't ideal. So my last 2 clutches all I did was lower the temps to 87 degrees to see if we got better results.
Both clutches hatched between days 51 and 52, 70+ grams babies, yolks fully absorbed, they couldn't look healthier to me. I expected longer hatch dates honestly, but if I keep getting ideal babies, I see no reason not to keep doing this. Might be a bad picture, but this little girl came out today from a bumblebee het hypo x hypo clutch  Can't wait for first shed now lol. Can't wait for first shed now lol.

Now my big question is why am I getting early hatch dates? I look at the differences between my design and CCI and I would say I more than likely have more humid air. Also the fresh air might have something to do with it? you would think it might dry out the air slightly, but maybe getting rid of egg outgassing helps? I also wonder, while the air pump is not very strong at all, if it is putting small amount of pressure on the eggs, basically making the incubator a pressure cooker? Any theories I am welcome to.
I have a 6 foot chest freezer I plan on turning into a upscaled version of this design this year. See if I can repeat the same results. Regardless, I am very happy with this design as it really is idiot proof, put eggs in, wait til they hatch, I haven't had an issue come up that used to almost always happen to me before. No substrates to work with either. Obviously I do monitor the eggs, but I could of just as easily put them in and came back 51 days later and still had the same result. I do also put them in a box inside the incubator once they pip, I just fear they might venture through the light diffuser. If anyone is brave enough to experiment with me, I would love to hear your results as well. I'm sure there are still plenty of ways to improve upon this.
Last edited by OhhWatALoser; 09-12-2014 at 04:56 PM.
-
The Following 6 Users Say Thank You to OhhWatALoser For This Useful Post:
CryHavoc17 (09-12-2014),Jcash34 (07-14-2015),Megg (07-06-2015),sapphira80 (05-29-2015),se7en (08-06-2015),somnambulant (11-09-2014)
-
BPnet Veteran

Re: So I think I have an idiot proof incubator...
Wow that is a killer design. I may just give this a shot myself
Sent from my SM-G730V using Tapatalk 2
-
-
BPnet Veteran

I always wondered if fresh air should be forced into the incubator some how. After a month or two the incubator always seems stale and sort of stinky. I never had a problem with my babies in my mini fridge incubator. I never tried anything because I have never heard of anyone pumping air in. I would be curious to see what would happen if I used one of the aquarium pumps I have laying around.
-
-
I would be interested in hearing if that changes your results
-
-
BPnet Veteran
I would be willing to try it given Ohhwhataloser's success. Has anybody ever done anything like this before? In my head I will have a lot of tubing and have it run down the flexwatt so the air is the same and run it with a valve slowing it,to about half directly into the egg tub. I also go substrateless and could have it into the water or somewhere as long as it's not directly blowing on the eggs it should be fine. I could also put it on a timer to run a couple of minutes every hour. I have more fish than I do snakes so I have this stuff laying around! (Also I have 17 snakes so that tells you what's going on in my life lol)
Has anyone ever tried this? Or anything like it?
-
-
If you do, I found a big bubble stone works much better than small ones, doesn't cause a miniature fountian in the incubator
-
-
BPnet Veteran
Sorry to dig up an old thread but my albino finally ovulated on Wednesday! I am going to be putting my incubator back together and adding in the element of fresh air pumped in and give it a go! I will start a new thread with my incubator build and to keep track of my progress either tomorrow or next weekend (whenever I get around to putting the bator back together lol) did you have any clutches this year and any new results to report OhhWatALoser??
-
-
First clutch should be hatching in a week, if I am still getting the low 50 hatch dates
-
-
Registered User

So does the air pump come on when the heater kicks on, or is it running all the time ?
-
-
The air pump stays on all the time.
I had another day 51-52 hatch, then 1 took his time and stayed in there til like 54 lol.
-
The Following User Says Thank You to OhhWatALoser For This Useful Post:
andyroof1979 (05-25-2015)
Posting Permissions
- You may not post new threads
- You may not post replies
- You may not post attachments
- You may not edit your posts
-
Forum Rules
|


 Reply With Quote