» Site Navigation

3 members and 1,862 guests
Most users ever online was 6,337, 01-24-2020 at 04:30 AM.
» Today's Birthdays
» Stats
Members: 75,103
Threads: 248,542
Posts: 2,568,768
Top Poster: JLC (31,651)
|
-
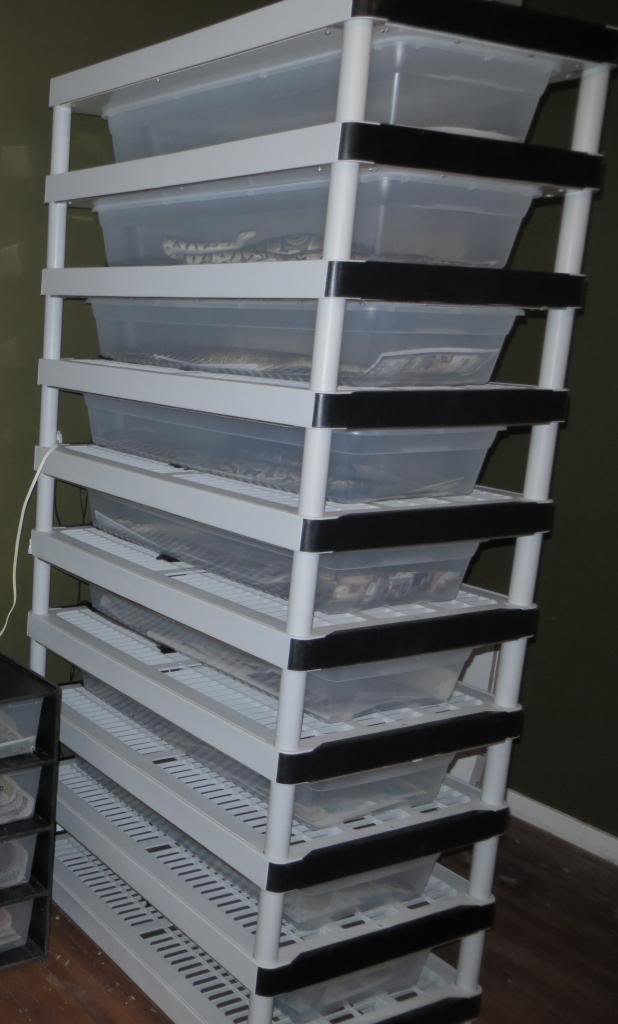
DIY 9 Tub Breeder Rack (lightweight plastic shelving unit)
I saw a video on YouTube on how to make this rack and I love it! It's very easy to make, fairly inexpensive, lightweight, and you can take it apart in minutes.
The finished product, it will cost just under $300 including the flexwatt. I'm still debating on putting sides on the rack, it's nice to be able to see any breeding going on without opening the tub.
What you will need to buy:
You will need two of these shelving units from Home Depot, they are 2x3 feet, and 5 shelves high, $50 each, link

2 sheets of 1/8th whiteboard/hardboard, $12 each. You will need to cut them down into 2x3 foot sections, you will use all of them and there will only be 2 small extra pieces.
9 plastic 41qt tubs, I got mine at Walmart, I think they are $8 each http://www.walmart.com/ip/Sterilite-...-of-6/10401039
9, 1 foot sections of 12 inch flexwatt $27, with connectors ~$50 (plus shipping), I get mine from Reptile Basics
2 packs of composite window shims, $2 each link to lowes
And of course tape/screws/etc.
Ok, now for the fun part, building!
Your whiteboard is already cut into 2x3 foot sections, now you need to cut out the corners, just enough to make room for the posts

We clamped several pieces together so it took less cutting. 2x2 inches should be enough, we did 2 1/4 x 2 1/4 to be safe.

Once you have those cut you put them on the underside of the shelf, remember the white board is the lid of your tub. You could put it where the tub sits as well, but it's really not necessary. The way I see it heat rises so there shouldn't be a lot of heat loss.


On the shelf

3 screws down the sides and 2 screws on the front and the back are enough. Just make sure you put the screws on the front next to the posts so your tubs don't rub on them.
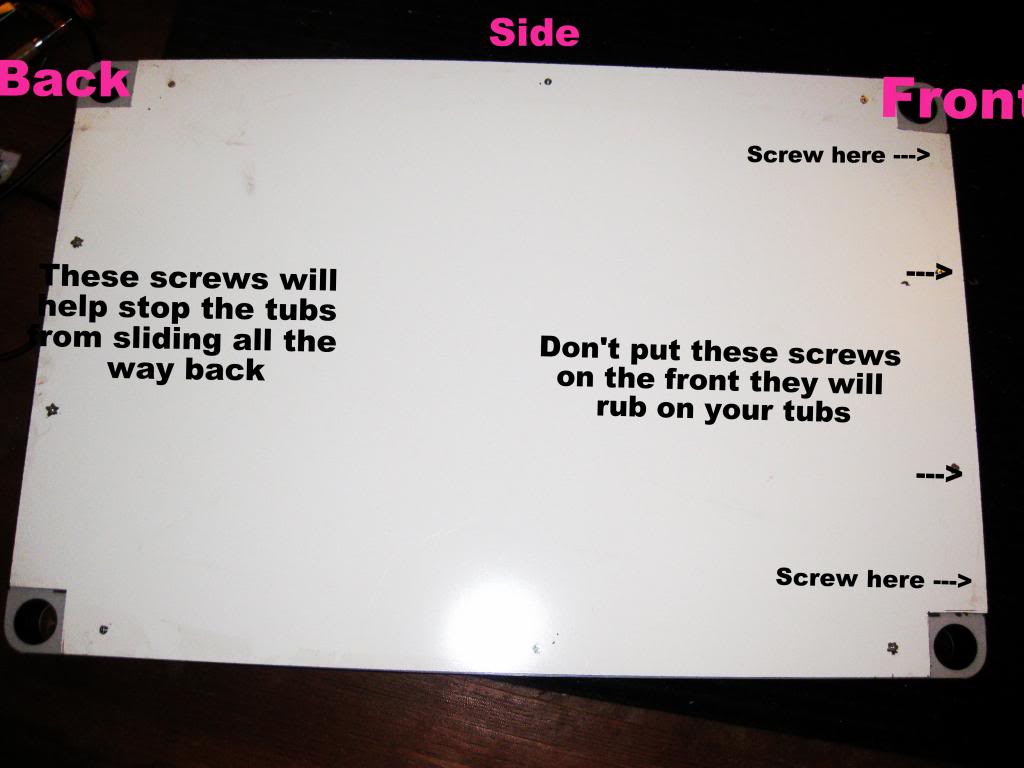
Here you can see the screw next to the post on the front side of the rack, your tub will not be that far over, I was just measuring the width I needed.

It's always nice to have helpers

The window shims will keep your tubs from rubbing on the flexwatt. This will also help stop your tubs when you push them in.

Screw the shims into the shelf and slide the flexwatt under it. Do not screw them in tight, they are just there for your tubs to slide on and to hold your flexwatt down. You will want to tape down the front of your flexwatt so it doesn't catch on your tubs when you slide them in. I use duct tape.

Here you can see where I had to take out the screws on the front and move them closer to the posts.

Then you just assemble and done! You can put screws in the posts to hold the rack in sections to move it in pieces. I left it as is so I can take it completely apart. Also, the posts are longer in the back than in the front to help the tubs slide better and keep the tubs tight.

Last edited by SlitherinSisters; 03-24-2013 at 05:26 PM.
-
The Following 12 Users Say Thank You to SlitherinSisters For This Useful Post:
- + Show/Hide list of the thanked
-
Anya (06-25-2013),Elusive Dream (06-13-2013),iBeLucKy (03-24-2013),mfsidore (04-24-2014),MisterKyte (03-26-2013),PeterPieBaldPython (12-12-2014),rlditmars (08-28-2014),satomi325 (03-24-2013),smc1118 (06-30-2013),steve_r34 (02-20-2014),Yamitaifu (11-02-2013),zeion97 (03-25-2013)
Posting Permissions
- You may not post new threads
- You may not post replies
- You may not post attachments
- You may not edit your posts
-
Forum Rules
|


 Reply With Quote