Vote for BP.Net for the 2013 Forum of the Year! Click here for more info.

» Site Navigation

» Home
 > FAQ

» Online Users: 2,820

1 members and 2,819 guests
Most users ever online was 6,337, 01-24-2020 at 04:30 AM.

» Today's Birthdays

None

» Stats

Members: 75,078
Threads: 248,524
Posts: 2,568,615
Top Poster: JLC (31,651)
Welcome to our newest member, RaginBull
Page 1 of 3 123 LastLast
Results 1 to 10 of 22
  1. #1
    BPnet Veteran jessie_k_pythons's Avatar
    Join Date
    06-03-2006
    Location
    Ft. Gordon, GA
    Posts
    1,171
    Thanks
    0
    Thanked 2 Times in 2 Posts
    Images: 20

    Sculpting a BP part 1 **DU NO NO!

    Well to answer your question Shel, I sculpted the head and body (not shown yet) all by hand. As for the heat pits and mouth it was all carved useing the strate Pick.

    Here is a Pictural to show how I made the head.
    Enjoy

    I started out with a lump of clay that i thought would be about the right size and then rolled it into a ball.


    I then shaped the head useing my fingers and rolling them to make the nose.
    I pressed in the sides of the nose to make the typical Ball Python Nose.


    It should end up looking something like this


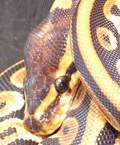
    If your having problems remembering the 3D aspects of a BP head, ask for help from one of your own "Model" BPs like this one.


    **not finished please do not post anything yet**

  2. #2
    BPnet Veteran jessie_k_pythons's Avatar
    Join Date
    06-03-2006
    Location
    Ft. Gordon, GA
    Posts
    1,171
    Thanks
    0
    Thanked 2 Times in 2 Posts
    Images: 20

    Re: Sculpting a BP part 1 **DU NO NO!

    Make shure that the sides of the head look good as well. you could have an awesome looking head but later find out your BP head has a lump on the top of the head you dont know about.


    now it is time to make the Nasal ridges, place your thumb and finger and press in at the top of the nose.


    now this will make the crown of the head to pop up a bit so press it back down and smooth it out.


    Now for the eyes! make the small lobes at the sides of the mouth where the eyes will sit above. *again you might need your BP Model for this.


    now you see the lobs and indents where the eyes will sit above.


    **not finished please do not post anything yet**

  3. #3
    BPnet Veteran jessie_k_pythons's Avatar
    Join Date
    06-03-2006
    Location
    Ft. Gordon, GA
    Posts
    1,171
    Thanks
    0
    Thanked 2 Times in 2 Posts
    Images: 20

    Re: Sculpting a BP part 1 **DU NO NO!

    I use stone beads for eyes that look to be a good fit.


    I place the eyes in the right spot and then press in.
    It will look very out of place with the eyes in but we can fix that.


    I take some more clay and roll it long. I then take pieces off of it roll it again and place it around the eyes.


    I smoth it out untill nice an flush. Repeat on the other side.


    And there you have it. The start of your BP head.


    **I'm finished, Fell free to post now

  4. #4
    BPnet Veteran jessie_k_pythons's Avatar
    Join Date
    06-03-2006
    Location
    Ft. Gordon, GA
    Posts
    1,171
    Thanks
    0
    Thanked 2 Times in 2 Posts
    Images: 20

    Re: Sculpting a BP part 1 **DU NO NO!

    I will post more for the next step later... I'm taking a brake LOL

  5. #5
    BPnet Senior Member Nate's Avatar
    Join Date
    07-31-2004
    Location
    Northern Virginia
    Posts
    9,863
    Thanks
    127
    Thanked 625 Times in 386 Posts
    Images: 15

    Re: Sculpting a BP part 1 **DU NO NO!

    now that is pretty darn impressive i must say!! Keep us updated on progress PLEASE!

  6. #6
    BPnet Veteran steveo's Avatar
    Join Date
    08-10-2006
    Location
    Devon - westcountry - uk
    Posts
    836
    Thanks
    1
    Thanked 4 Times in 3 Posts
    Images: 13

    Re: Sculpting a BP part 1 **DU NO NO!

    :eek: WOW you make it look so easy , i gotta try it but i still reckon mine would look like a slug
    [b]Steve Irwin Febuary 22nd 1962 - September 4th 2006 [font=Century Gothic]R.I.P


  7. #7
    _\m/ Smulkin's Avatar
    Join Date
    02-07-2004
    Location
    Ridgemont High
    Posts
    7,492
    Thanks
    0
    Thanked 5 Times in 3 Posts
    Images: 68

    Re: Sculpting a BP part 1 **DU NO NO!

    Any particular kind of clay you use?

    Does it work as well with, say Fimo?

    "I don't FEEL tardy . . ."


  8. #8
    BPnet Veteran jessie_k_pythons's Avatar
    Join Date
    06-03-2006
    Location
    Ft. Gordon, GA
    Posts
    1,171
    Thanks
    0
    Thanked 2 Times in 2 Posts
    Images: 20

    Re: Sculpting a BP part 1 **DU NO NO!

    I use Sculpy or any good Polymer Clay. I like Sculpy because it carves and paints nicely

  9. #9
    BPnet Veteran Mendel's Balls's Avatar
    Join Date
    04-07-2006
    Location
    Pennsylvania
    Posts
    1,073
    Thanks
    94
    Thanked 39 Times in 22 Posts
    Images: 40

    Re: Sculpting a BP part 1 **DU NO NO!

    Nice tutorial thanks for posting.
    ~ 1.0.0 Python regius ~ Wild-type ~
    ~
    1.0.0 Canis familiaris ~ Blue Italian Greyhound ~

    ~ 0.0.9 Danio rerio~ Wild-type and Glofish


  10. #10
    BPnet Veteran lillyorchid's Avatar
    Join Date
    12-27-2005
    Location
    SoCal
    Posts
    3,538
    Thanks
    74
    Thanked 100 Times in 77 Posts

    Re: Sculpting a BP part 1 **DU NO NO!

    This is really good. Thanks for sharing, I can't wait to see more!
    ---=ALLISON=---
    "Not everyone is going to agree or listen to what you say but I have learned to do my best to educate and hope they listen in the long run. Just keep trying to educate. There will be people out there that actually do listen and learn. -Me"

Page 1 of 3 123 LastLast

Posting Permissions

  • You may not post new threads
  • You may not post replies
  • You may not post attachments
  • You may not edit your posts
  •  
Powered by vBadvanced CMPS v4.2.1