» Site Navigation

0 members and 2,904 guests
No Members online
Most users ever online was 6,337, 01-24-2020 at 04:30 AM.
» Today's Birthdays
» Stats
Members: 75,079
Threads: 248,524
Posts: 2,568,620
Top Poster: JLC (31,651)
|
-
DIY: Crested Gecko Tubs
I really like tub setups for my reptiles. Glass cages are nice, but once you acquire more than a few animals that each require their own glass tank, it gets rather expensive, heavy, and cumbersome.
I followed a few guides on how to make tubs for crested geckos and I thought I would post how I put mine together.
One tub only takes about 30 minutes to assemble so get your tools ready!
Materials List:
Plastic tub: I used the container store's "deep sweater boxes". They are about equivalent to a 10g and nice and tall. They are also some of the clearest tubs on the market.
Screen Mesh: I used fiberglass screen which can be found at the Home Depot or Lowes for about $5 for a huge roll. You won't need nearly as much as provided for one tub, but chances are you will be getting a new gecko soon, right?
Plants and climbing branches:This can be as boring or elaborate as you want. I use plastic plants from the dollar store, sterilized sticks I find outside, and paper towel tubes. Remember that your crestie needs good sturdy climbing surfaces as well as foliage for hiding spots.
Tools:

These are the basic tools that you need to do this project.
The little blue thing with the cap on it is called an acrylic scorer. It is used to cut plastic and plexiglass. It works very very well at cutting tubs. You could use an exacto knife or a box cutter, but it will be much more difficult. These tools are only a couple of dollars at the home depot right by where they keep the plexiglass. Hopefully you all can recognize the other tools 
Step#1:
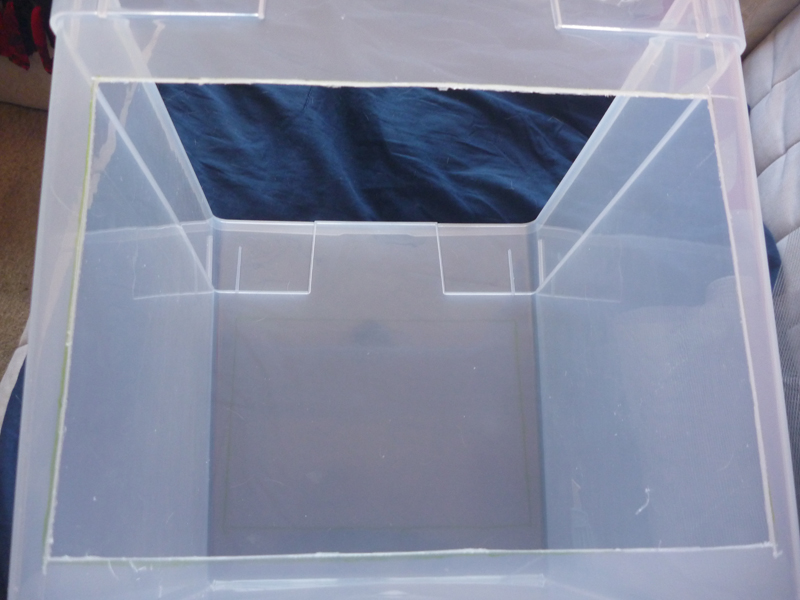
Mark where you want your screened in opening to be. I made mine 7"x11". The screen size is directly related to the humidity. If you live in a humid climate, make a bigger screened area. If you live in a very dry climate, make the screened area smaller. You want enough screen to allow good air flow, but not too much so that it doesn't hold any humidity. The tub should go through a humidity cycle. After you mist, the enclosure should be able to dry out before you mist again.
I cut out two squares, one on the front side of the tub and one on the back. The screen also doubles as a good climbing surface for cresties.

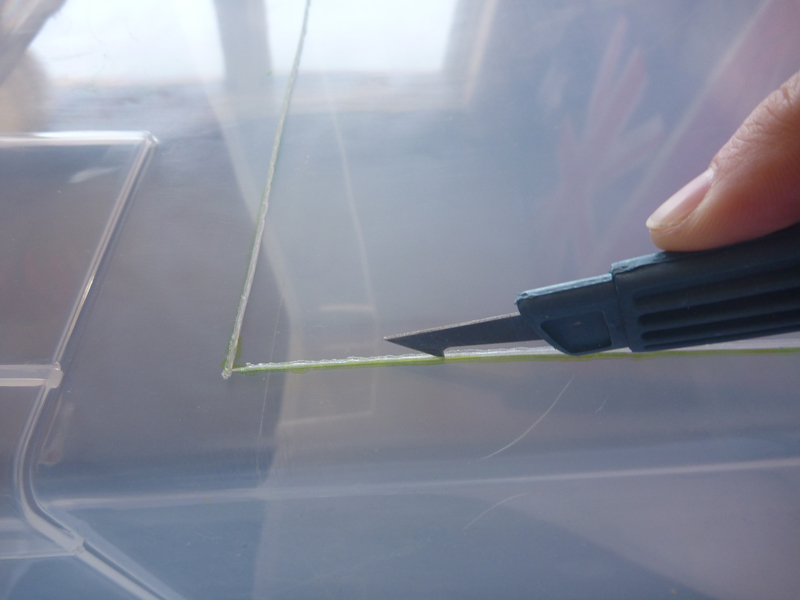
This is how you use the acrylic scorer.

Step#2:
Wash your tub! I like to do this after I cut the square for the screen. Less surface area to clean and easier to dry.
Step#3:
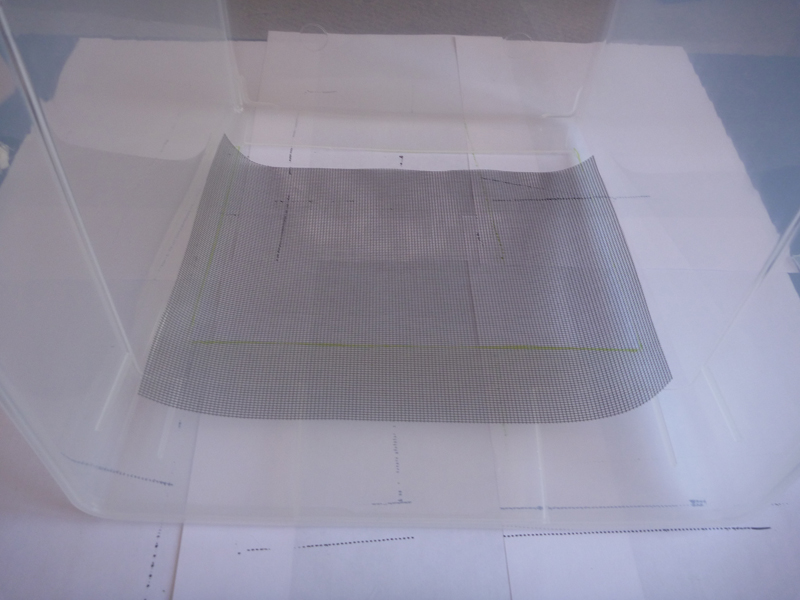
Cutting the screen. Make sure you cut the screen a little bit bigger then the opening you cut in your tub. I made my screen pieces 1/2" bigger on all
sides.

Place your screen on the inside of the tub and check to make sure it fits well. If it is a little bit big, trim a little off the sides and check it again. Start out a little bit bigger then what you think you need. It is much easier to trim a little bit off the side, and much more wasteful to re-cut the piece of screen if you make it too small.

Step#4:
Hot glue the screen to the tub. This is probably the trickiest part. Lay the screen as flat as you can over the opening. I like to hold the screen nice and tight over the edges and put a little bit of glue there to hold it in place before I do the whole thing.
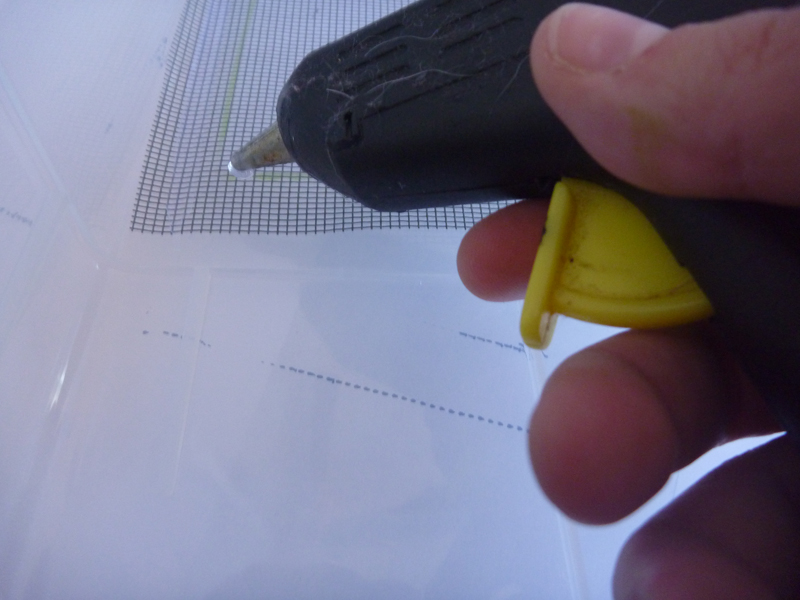
Make sure the screen is touching the tub so that the hot glue can get into the mesh and adhere itself to the tub. I will sometimes press my finger over the freshly laid hot glue to press it in and seal it. This is kind of painful since the glue is very hot, but it isn't enough to cause burns (or maybe my skin is just that tough now  ). You don't need to do this, I think it looks a little nicer in the end if you do. ). You don't need to do this, I think it looks a little nicer in the end if you do.

Check to make sure the screen is secure. Gently press your hand on the screen from the outside. Make sure there are no gaps in the glue. If it feels nice and taught you are good to go!

Tada! Your tub is now done! All that is left is to decorate it
Add in your substrate. I like to use paper towels. They look clean, and it is easy to spot poo. Mmm Poo.
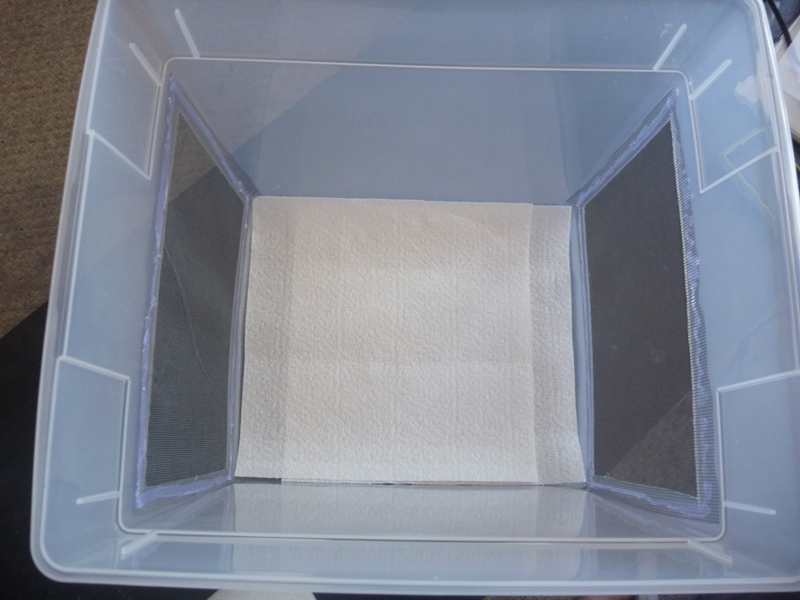
This is your chance to be creative. Arrange your plants, sticks, paper towel tubes, food dishes, hides! Here are some of my tubs that I have set up. Make sure you take advantage of the vertical space and put plants and climbing branches up there too. Cresties like to climb and jump!
Here is a good way to attach larger leaves and vines into your tub. I cut the leaves off a dollar store fake plant and threaded them through some soldered holes in the tub.


The best part is, they are stack-able!

Post pictures of tubs you have made for your geckos!
-
The Following 20 Users Say Thank You to Kaorte For This Useful Post:
- + Show/Hide list of the thanked
-
AlexisFitzy (01-05-2015),Allie Weibel (10-12-2011),ALTownsend1 (03-29-2010),Anya (01-28-2012),BHReptiles (06-10-2013),bill.allred (10-07-2011),DavisonReptileCo (04-08-2010),Forrester86 (07-18-2013),gunkle (03-21-2019),JaredJEstes (01-04-2015),jben (03-30-2010),jmc reptiles (05-27-2010),John1982 (12-10-2011),likebull1 (03-30-2010),Mephibosheth1 (07-09-2013),Pampho85 (06-17-2012),pavlovk1025 (04-22-2010),RR - Mackenzie (06-21-2010),steveboos (12-11-2010),waltah! (04-23-2010)
-
Registered User

Re: DIY: Crested Gecko Tubs
-
-
BPnet Veteran

Re: DIY: Crested Gecko Tubs
Very nice! When I get some cresties I will definitely use this!
Christina
0.1 Normal BP "Cleo"
1.1 Bearded Dragons "Munch" and "Ziggy"
1.0 Red Eared Slider "Norwell"
-
-
-
-
Re: DIY: Crested Gecko Tubs
They have a little trouble climbing the plastic at first, but after the static dissipates, they can climb it just fine. Plus they can stick to the screen as well. I don't really mist the sides of the tubs as much as the fake plants and climbing branches.
I should do a test to see how well they can climb the wet tub vs. the dry tub.
I wash the tubs really well a couple times before I put the geckos in them and they can climb pretty well.
I made an order last week for some bamboo sticks, so I am waiting on those and I will be adding more hard climbing surfaces.
-
The Following User Says Thank You to Kaorte For This Useful Post:
-
-
-
Re: DIY: Crested Gecko Tubs
Emily do you have a picture of your herp room? More specifically the rhac part? I really like to see how other people have setup their geckos
-
-
-
-
Re: DIY: Crested Gecko Tubs
 Originally Posted by mlededee

Haha, um I'm not sure I can get in there at an angle where I could get a decent picture. It's a little tight.  I have plans to redo the whole rhac portion of the room, and I will definitely get photos when that is complete. But that also involves scaling back on the geckos quite a bit in order to reduce the stacks (I may have been a bit over zealous with the breeding in the last 2 seasons and ended up with kind of a lot of babies ).
Lol! I know what you mean. I don't yet have my own reptile room (sad!) but I should have my own reptile "area" by this summer.
Definitely take pictures when you are done re-doing everything!
-
-
BPnet Veteran

Re: DIY: Crested Gecko Tubs
NEVER RELEASE FISH OR REPTILES OR ANY ANIMAL INTO THE WILD. 
Please read the CARESHEET! to make sure you're doing the best you can for your pet.
-
Posting Permissions
- You may not post new threads
- You may not post replies
- You may not post attachments
- You may not edit your posts
-
Forum Rules
|


 Reply With Quote


 I never though about putting leaves though the ventilation holes like that--that's a really great idea!